It turns out that it is surprisingly easy to add a multi line select list to the
UI. There are four main parts to it. The layout file, a subclass to the adapter,
the activity and of course the data itself.
Lets start with the data. For the sake of this demo, lets use a simple contact
list:
 1
 2
 3
 4
 5
 6
 7
 8
 9
10
11
12
13
14
15
16
17
18
19
20
21
22
23
24
25
26
27
28
29
30
31
32
33
34
35
| package uk.co.kraya.android.demos.MultiLineList.domain;
public class Contact {
private String firstName;
private String lastName;
private String mobile;
public String getFirstName() {
return firstName;
}
public void setFirstName(String firstName) {
this.firstName = firstName;
}
public String getLastName() {
return lastName;
}
public void setLastName(String lastName) {
this.lastName = lastName;
}
public String getMobile() {
return mobile;
}
public void setMobile(String mobile) {
this.mobile = mobile;
}
}
|
Some straightforward fields and getters/setters
Next, we need an Adapter. For this one, we will use
a ArrayAdapter
.
We will extend it so that we can override
the getView method.
 1
 2
 3
 4
 5
 6
 7
 8
 9
10
11
12
13
14
15
16
17
18
19
20
21
22
23
24
25
26
27
28
29
30
31
32
33
34
35
36
37
38
39
40
41
42
43
44
45
46
47
48
49
50
51
52
53
54
55
56
57
| package uk.co.kraya.android.demos.MultiLineList.domain.adapters;
import java.util.List;
import uk.co.kraya.android.demos.MultiLineList.domain.Contact;
import android.content.Context;
import android.view.LayoutInflater;
import android.view.View;
import android.view.ViewGroup;
import android.widget.ArrayAdapter;
import android.widget.TwoLineListItem;
public class ContactArrayAdapter extends ArrayAdapter {
private final int resourceId;
public ContactArrayAdapter(Context context, int textViewResourceId, List objects) {
super(context, textViewResourceId, objects);
resourceId = textViewResourceId;
}
@Override
public View getView(int position, View convertView, ViewGroup parent) {
Contact c = getItem(position);
// if the array item is null, nothing to display, just return null
if (c == null) {
return null;
}
// We need the layoutinflater to pick up the view from xml
LayoutInflater inflater = (LayoutInflater)
getContext().getSystemService(Context.LAYOUT_INFLATER_SERVICE);
// Pick up the TwoLineListItem defined in the xml file
TwoLineListItem view;
if (convertView == null) {
view = (TwoLineListItem) inflater.inflate(resourceId, parent, false);
} else {
view = (TwoLineListItem) convertView;
}
// Set value for the first text field
if (view.getText1() != null) {
view.getText1().setText(c.getFirstName() + " " + c.getLastName());
}
// set value for the second text field
if (view.getText2() != null) {
view.getText2().setText("mobile: " + c.getMobile());
}
return view;
}
}
|
The key bit here is the getView method. We pick up
the LayoutInflater
which we can use to pick up the view that defines
the TwoLineListItem
view. This allows us to use two different snippets of text as part of the list.
We then pick up the each of
the TextView
items and set the text against them. The formatting of these item are defined in
the xml file.
The TwoLineListItem class also defines a placeholder for the selectedIcon. Check
the documentation for more info.
The xml file for the layout goes as follows:
 1
 2
 3
 4
 5
 6
 7
 8
 9
10
11
12
13
14
15
16
17
18
19
20
21
22
23
| <?xml version="1.0" encoding="utf-8"?>
<TwoLineListItem xmlns:android="http://schemas.android.com/apk/res/android"
android:layout_width="fill_parent"
android:layout_height="wrap_content">
<TextView android:id="@android:id/text1"
android:layout_marginTop="1dip"
android:layout_width="wrap_content"
android:layout_height="wrap_content"
android:textSize="15sp"
android:textStyle="bold" />
<TextView android:id="@android:id/text2"
android:layout_width="wrap_content"
android:layout_height="wrap_content"
android:layout_below="@android:id/text1"
android:layout_alignLeft="@android:id/text1"
android:paddingBottom="4dip"
android:includeFontPadding="false"
android:textSize="15sp"
android:textStyle="normal" />
</TwoLineListItem>
|
As you can see, we are just defining a TwoLineListItem element with two embedded
TextItems. Tthe android:id parts are important. It ensures that the getText1()
and getText2() methods work as expected!
Finally, we have the activity. In fact, we will be using a
ListActivity
as follows:
 1
 2
 3
 4
 5
 6
 7
 8
 9
10
11
12
13
14
15
16
17
18
19
20
21
22
23
24
25
26
27
28
29
30
31
32
33
34
35
36
37
38
39
40
41
42
43
| package uk.co.kraya.android.demos.MultiLineList;
import java.util.ArrayList;
import java.util.List;
import uk.co.kraya.android.demos.MultiLineList.domain.Contact;
import uk.co.kraya.android.demos.MultiLineList.domain.adapters.ContactArrayAdapter;
import android.app.ListActivity;
import android.os.Bundle;
public class MultiLineListDemo extends ListActivity {
/** Called when the activity is first created. */
@Override
public void onCreate(Bundle savedInstanceState) {
super.onCreate(savedInstanceState);
setListAdapter(new ContactArrayAdapter(this, R.layout.main, getContacts()));
}
private List getContacts() {
List contacts = new ArrayList();
Contact c;
c = new Contact();
c.setFirstName("Shriram");
c.setLastName("Shrikumar");
c.setMobile("07777777777");
contacts.add(c);
c = new Contact();
c.setFirstName("John");
c.setLastName("Doe");
c.setMobile("MOBILE.NUMBER");
contacts.add(c);
return contacts;
}
}
|
getContacts clearly just creates a couple of contacts for the sake of the demo.
its the setListAdapter that is the key here. It creates a new
ContactArrayAdapter that we have written, passes in the context (which is just
the current activity), a resource ID and a List of items to display.
Run it and you should see something like:
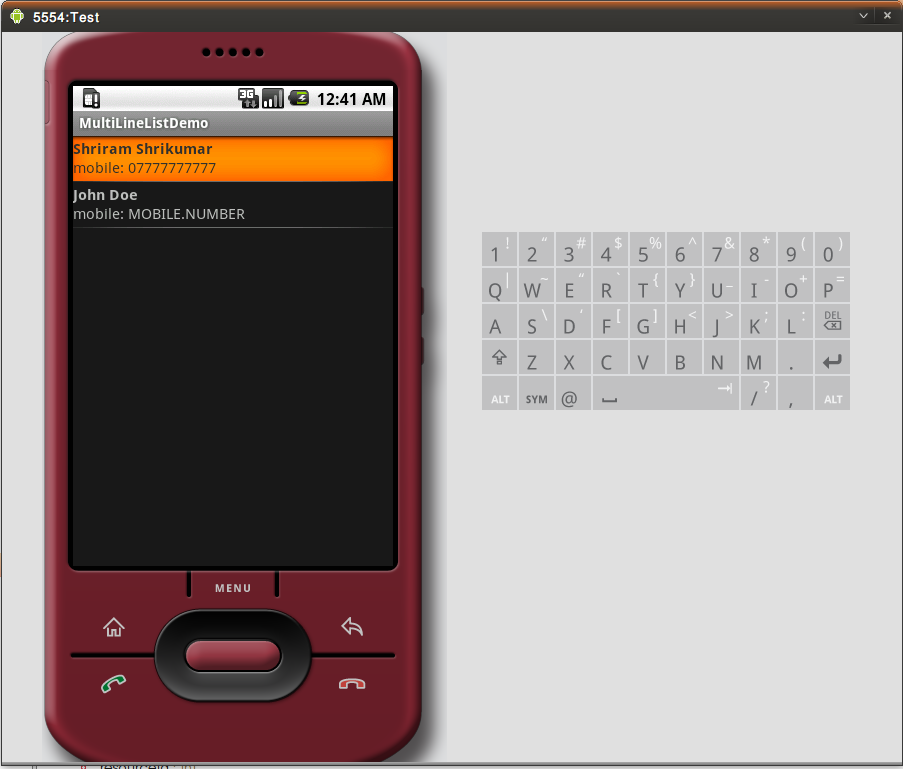
So easy when you know how. I believe could use a View or a ViewGroup as needed
instead of the TwoLineListItem but I shall leave that to you to discover.
I have included all the files that I created/modified but if you want the whole
project tarred up, just drop me a note ;-)